Everything on Docker (Part lll)

In the last two articles, we have worked with docker basics and how to dockerize a project. However, in this article, we are going to deploy a dockerized project on AWS. Sit tight! 👊
To just focus on docker and AWS, we are going to generate a project based on nodejs. Considering you are on Linux OS, to install nodejs?
sudo apt install nodejs
After that, check the version on your terminal:
mahedi@mahedi-VirtualBox:~$ node -v
→ v10.19.0
Let’s create the project with the following command:
npx create-react-app frontend
It will create a project named “frontend”. Now, if you face any dependency issues, just make sure to install it by “sudo apt install <name>”. Let’s overview some of the important commands to run a nodejs project and find out their meaning.
- npm run start → start up the development server.
- npm run test → run tests associated with the project
- npm run build → to build a production version of the project/app
Now go inside the “frontend” directory and try “build →start”. You will see the react app is running in your web browser automatically!

Now, it is time to start working with Docker. As we have seen:
- npm-Build → production level
- npm-start → development level
Therefore, we are going to build a Dockerfile for the development level and it’s going to be called “Dockerfile.dev”. Make sense? No?
- Dockerfile.dev → The purpose of this dockerfile is to run the app at the development level.
Now, do you remember how to write a dockerfile? No? Check it from here:
Everything on Docker (Part ll) & Everything on Docker (Part l)
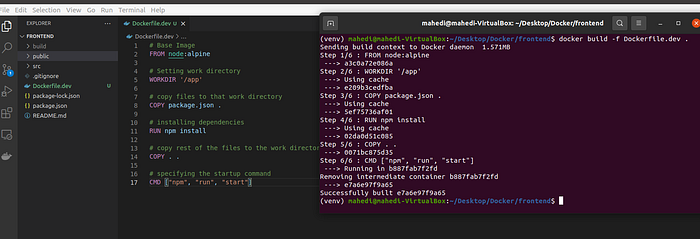
When you are done checking, come back here! Our “Dockerfile.dev” will be looked like this:

Now with typical “docker build .” will not work because this Dockerfile is created for development purposes as “Dockerfile. dev”. Therefore, we have to specify that Dockerfile to build.
→docker build -f Dockerfile.dev .
- -f is used to identify that specific Dockerfile.
The image will be created. However, you will see something like this:
Sending build context to Docker daemon 196.3MB
→ purpose: this is installing all the dependencies of the node app which is unnecessary because we going to install them using our docker image. So, remove the “node_nodules” from the project and run the docker build command again.
Now, take that docker image id and create a container out of it. Remember- to use port mapping. Otherwise, it will not work!
→docker run -it -p 3000:3000 <image-id>
You will be able to see the same output again. The question might be raised?
→What if I changed something in the app?
→How can I make the changes to the container as well?
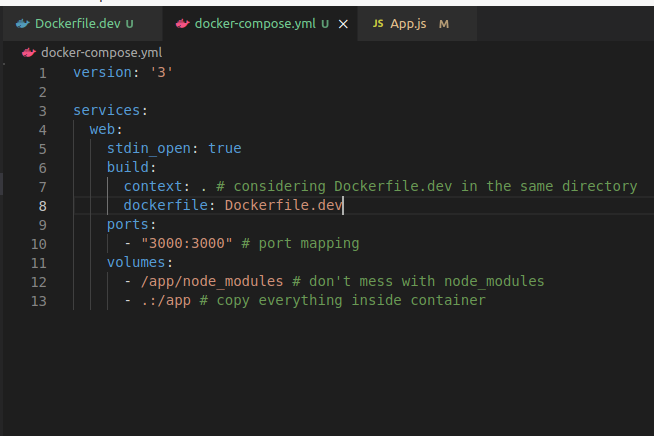
Docker Volume is the answer. Let’s see the command first and then an explanation.
docker run -it -p 3000:3000 -v /app/node_modules -v $(pwd):/app <image-id>
Explanation:
- $(pwd):/app → We are instructing that copy all the files in the current directory (outside the container) to the “/app” directory (inside the container)
- PWD → Identifies the current directory.
- -v /app/node_modules → We deleted the node_moduels folder in the local directory (PWD), right? That being said, there is no node_modules folder in the local directory to copy inside the container. That is why we are instructing to use the “node_modules” folder from the container. Therefore, it is saying that don’t try to do anything or map with node_modules inside the container.
- :/app → Copying something inside the container directory.
Now, run the command and see the changes that you have made inside the app.
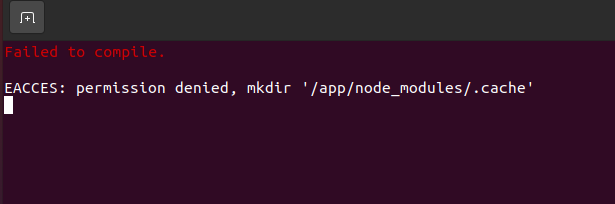
Uh, oh! We are getting permission denied because of the root users. We need to change it to the node user and make a new directory to copy the files there.

“We are then creating a directory of /home/node/app prior to the WORKDIR instruction. This will prevent a permissions issue since WORKDIR by default will create a directory if it does not exist and set ownership to root. The inline chown commands will set ownership of the files you are copying from your local environment to the node user in the container. The end result will be that all files and directories in the project will no longer be owned by root and will instead be owned by the node user.”
→ Build the image again!
→ run the container again!!

Looks good so far! But do you remember the docker-compose idea? Yeah? Okay, let’s do it.
Run:
→docker-compose up
You will see the same results. Cool!
We have talked about the development server so far. It’s time to make the production-level container. There are two phases to complete that in the Dockerfile: →Build Phase and → Run Phase.
Step 1: Create the image using → “docker build .”


Step 2: Run the container using → docker run -it -p 8080:80 <image-id>


We are ready for the next steps, which are:
- Github setup →Free
- TravisCI setup →Free
- AWS setup →Free but requires your card information
Github Setup
I am assuming you have GitHub knowledge. Therefore, create a repo inside your account and push your app to that repo. The commands to push your code to repo would be:
→ git init
→ git add .
→ git commit -m “initial commit”
→git remote add origin <your git repo>
→git push origin master
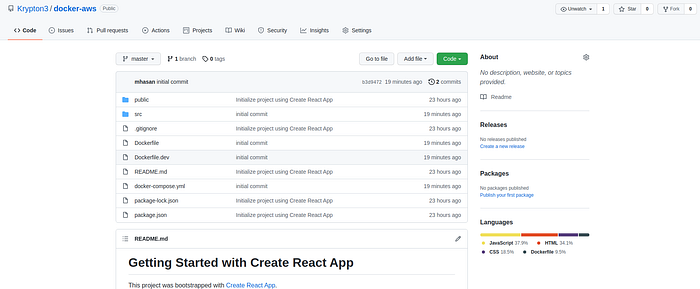
Your repository would look like this:
Travis CI Setup
“The simplest way to explain Travis CI is that it runs your program’s tests every time you commit to GitHub (this can be configured in many ways, and you can always disable builds on some branches). The point of this is that you can often discover very quickly if your commit broke something, and fix it before it becomes a problem. I would recommend running Travis CI on every GitHub repo that you have unit tests in and is using a programming language supported by Travis CI. Since setting up Travis CI is very easy, I don’t normally see a good reason not to use it unless you don’t care if you have passed tests in your program or not. Feel free to leave a comment if you have any more questions. You can read more about Travis CI here.”
Installation is pretty simple and after completing it, you will be able to see something like this:

→Allow Travis-CI to access your GitHub repository.
Aim: We want Travis CI to test our code. If the test passes, then deploy the code to AWS.
→ Now, let’s push the changes to the Github repository and Travis CI will take it from there.


That being said, all Travis CI is making sure that your app is ready for AWS deployment. Sounds cool, right?
AWS (Elastic Beanstalk)
→Create your AWS account!
→ Go to the “Elastic Beanstalk” section to create your application. To sum up, “Elastic Beanstalk” will create everything you need to deploy your app.
Configuration →


Running version of your app →

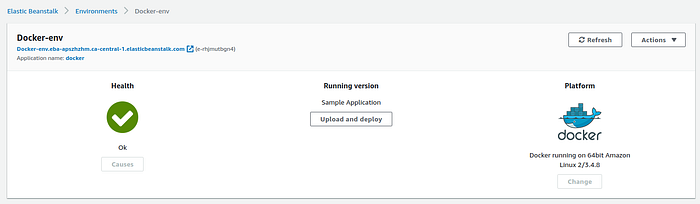
You see that link below “Docker-env”, which is your web application running on Elastic Beanstalk using docker.
Now, it’s time to let Travis CI inform how to deploy the app to the AWS application.

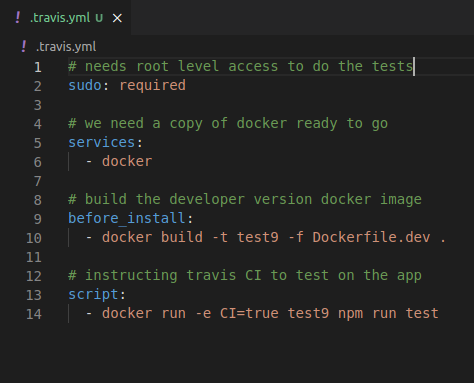
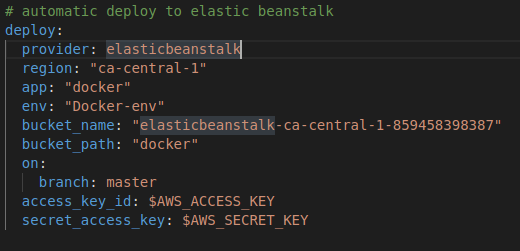
Let’s discuss the changes in the “!.travis.yml” file.
Line 17 →deploy: this command is used to tell travis.yml to automatically deploy the app in Elastic Beanstalk.
Line 18 →provider: Since we are going to use Elastic Beanstalk to deploy our project, it makes sense that “elasticbeanstalk” is the provider here. **Remember you have to use both words together.
Line 19 → region: Now, when we created the docker application in elastic beanstalk, we get a web link such as:
Docker-env.eba-apszhzhm.ca-central-1.elasticbeanstalk.com
Look at that link, there is a region mentioned there which is “ca-central-1”. Therefore, we have to set the region the same as the link that is generated.
Line 20: app → Mention the app name that you have provided.
Line 21: env → Now, while creating the app, a docker environment is created. You will be able to see that from here:
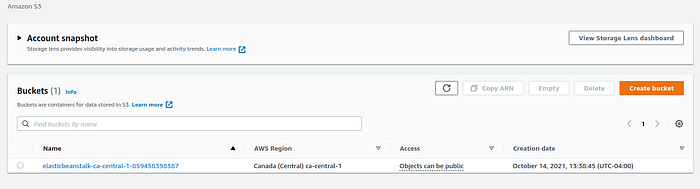
Line 22: bucket_name →When you created your app in Elastic Beanstalk, S3 also created a bucket for you (A scalable storage in the cloud). Basically, your local project from Github will be zipped and stored into this bucket. You can get the bucket name from S3.
Line 23: bucket_path → Everything will be stored inside that path and it will be created automatically when you first deploy your app in Elastic Beanstalk. It will be located here:

Line 24: on →master → This hierarchy actually means that only deploy to Elastic Beanstalk when there is an update in the master branch of the GitHub repo.
Now, we have to create a user, which is eventually used for authentication purposes in Travis cl. Steps of creating an IAM user:
→ IAM →Add user → gives a name →select “Access key — Programmatic access” →give elastic beanstalk full access →create user
This will give you all the credentials you need for Travis CI. Now, go to the settings of your project in Travis CI. For example, https://app.travis-ci.com/github/Krypton3/docker-aws/settings Now add the access key and secret key in the environment variable section.
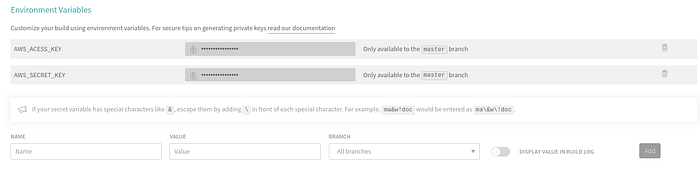
Now you can add the credentials to travis.yml in your repository.
→Don’t forget to EXPOSE port 80!


We are almost set to deploy. Did you forget something? Push the changes to your master branch. Travis CI will again build the app and load it to the EC2 instance that is created while creating Elastic Beanstalk. Okay, before showing you the magic, let’s wrap the whole thing one more time:
→Elastic Beanstalk:

Observe that the health of the instance is ok. You can see the app name and environment. We created the application on 64bit Amazon Linux <version> where docker is running. Now, the most important part, observe the running version section where Travis CI deployed the app. That being said, Travis CI compressed all the project contents and upload the zip file somewhere. Remember Bucket_name and Bucket_path?
→ S3 (Bucket)

Travis CI zipped everything and put it inside the “docker/” directory and that’s what we wrote inside the Travis CI yml configuration file. To complete that step Travis CI needed user credentials from AWS.
→IAM (Users)
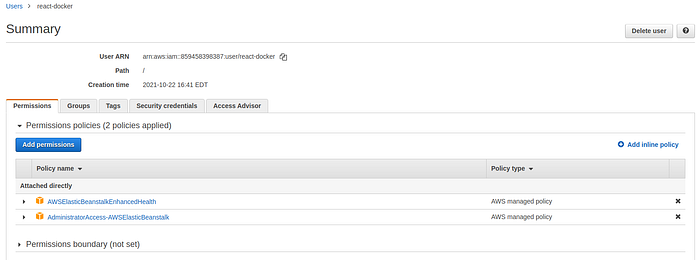
We created a user with the following policies. After receiving the credentials, we set them inside Travis CI yml file. That wraps up the AWS and Travis CI parts. Now, let’s see the magic!

Look at the URL. Our app is hosted by AWS using Travis CI. Pretty cool, isn’t it? When you are done, don’t forget to stop everything from AWS. I guess that’s enough for today. Cheers! 🙌